
The digital world revolves around instant gratification, especially when it comes to customer service. In this always-connected era, the demand for real-time responses is at an all-time high. To address this need, businesses are turning to Artificial Intelligence (AI)-powered chatbots.
Chatbots are not just about handling customer queries anymore; they have evolved into smart sales-enabling tools, nurturing leads and driving conversions in real-time, round the clock.
Setting up such a chatbot on your website may sound like a Herculean task requiring advanced coding skills. But with tools like Orimon AI, you can easily create and deploy a smart chatbot on your website, with no coding required. In this comprehensive guide, we’ll walk you through how to do it.
Benefits of a Smart Chatbot
Before we dive into the setup process, let’s discuss why you’d want to implement a chatbot on your website:
- 24/7 Customer Support: Chatbots are tireless, offering support at all hours, ensuring your customers’ queries never go unanswered.
- Improved Customer Engagement: By providing immediate, accurate responses, chatbots help keep customers engaged and interested in your product or service.
- Lead Nurturing and Conversion: Advanced chatbots can guide users along the sales funnel, boosting conversion rates.
- Cost Efficiency: Implementing a chatbot is much more cost-effective than hiring and training additional customer service staff.
Now, let’s get into the nitty-gritty of setting up a smart chatbot using Orimon AI.
Step 1: Register and Begin Your Journey

First things first, head over to the Orimon AI homepage. If you’re concerned about the price, you’ll be glad to know that Orimon AI is currently on sale at AppSumo. Instead of the usual monthly subscription fee, you can get lifetime access for a one-time payment! This deal offers incredible value, especially considering the robust features and capabilities of the Orimon AI platform.
Once you’ve purchased your lifetime deal, you’ll receive a unique registration code. Use this to sign up on the Orimon AI platform with your email and a secure password. After verifying your account, you’re ready to embark on your AI journey.
Next, click on “Create an assistant for your website” and enter your website URL. Orimon AI uses advanced AI algorithms to scrape your website, gathering crucial information about your business. This information forms the knowledge base that powers your chatbot.
This is an excellent opportunity to invest in a tool that can boost your business growth. The one-time payment offer is limited, so don’t miss out on this chance to secure lifetime access to Orimon AI at a discounted price.
Step 2: Create Your Chatbot
Now that you’re all set up, it’s time to build your chatbot. This may seem intimidating but don’t worry. Orimon AI’s interface makes this process easy and intuitive.
Begin the Bot Creation Process
Log into Orimon AI using your registered credentials. You’ll be directed to the bot creation page. Here, you’ll find seven different sections: Website, SiteMap, GitBook, PDF, Text, FAQs, and Catalog.
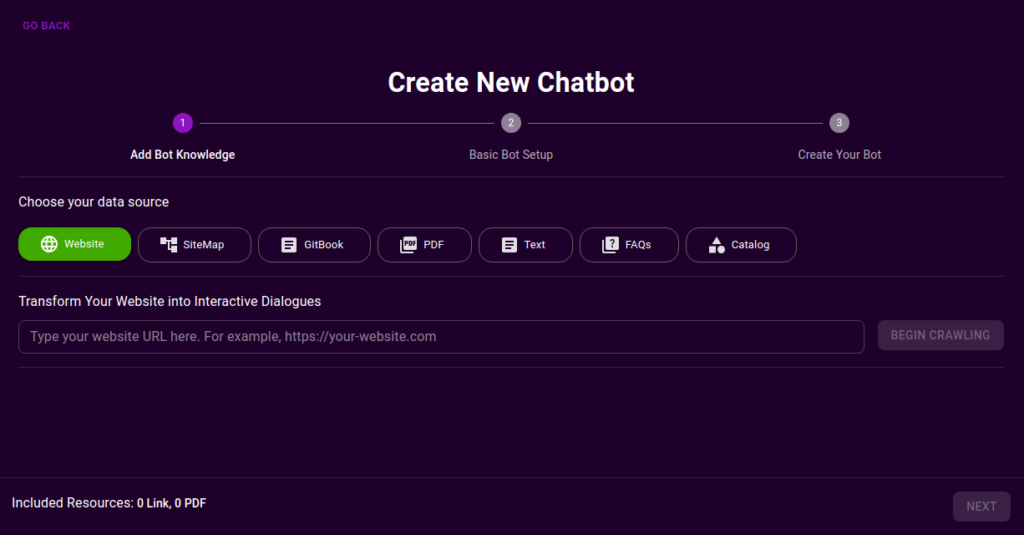
These sections represent the different sources from which Orimon AI can learn to create your chatbot.
Choose Your Training Material
Based on the type of business and the information you have available, click on the sources that you want to use to train your chatbot. For instance, if you have a comprehensive FAQ section on your website, select ‘FAQs’. If you have product catalogs, select ‘Catalog’.
Provide Your Chatbot Information
Once you’ve provided the relevant details, click on “Next” at the bottom right of the page. You’ll then see a page where you can name your chatbot, provide your company’s name, and select the language you want the chatbot to operate in.
Step 3: Train Your Assistant
One of the hallmarks of a robust AI chatbot is its ability to learn and improve over time. With Orimon AI’s innovative Flagging and Training feature, you can ensure your chatbot continually evolves to provide more accurate responses.
What is the Flagging and Training Feature?
The Flagging and Training feature is a user-friendly solution for continuous learning. If you or your team encounter any chatbot responses that aren’t quite right, you can flag them for correction. These flagged responses can then be edited in the training section, helping to improve the chatbot’s performance over time.
Let’s walk through how to use this feature:
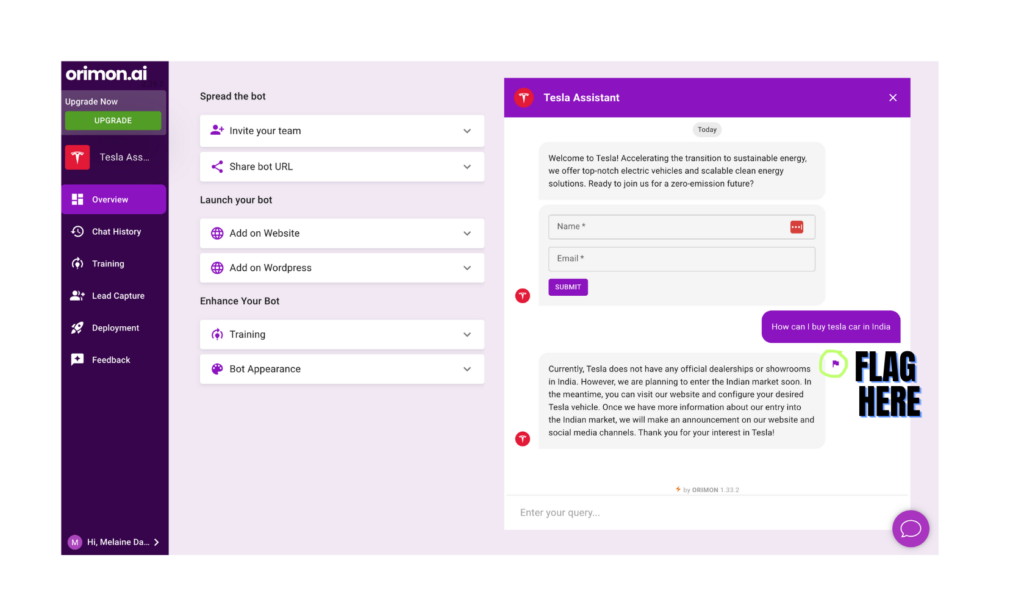
Flag Responses During Testing
When testing your chatbot either from the testing page on the Orimon Dashboard or using test bot links, you might come across a response that needs tweaking. Simply hover over the problematic response to reveal the “Flag” icon and click on it to flag the response.
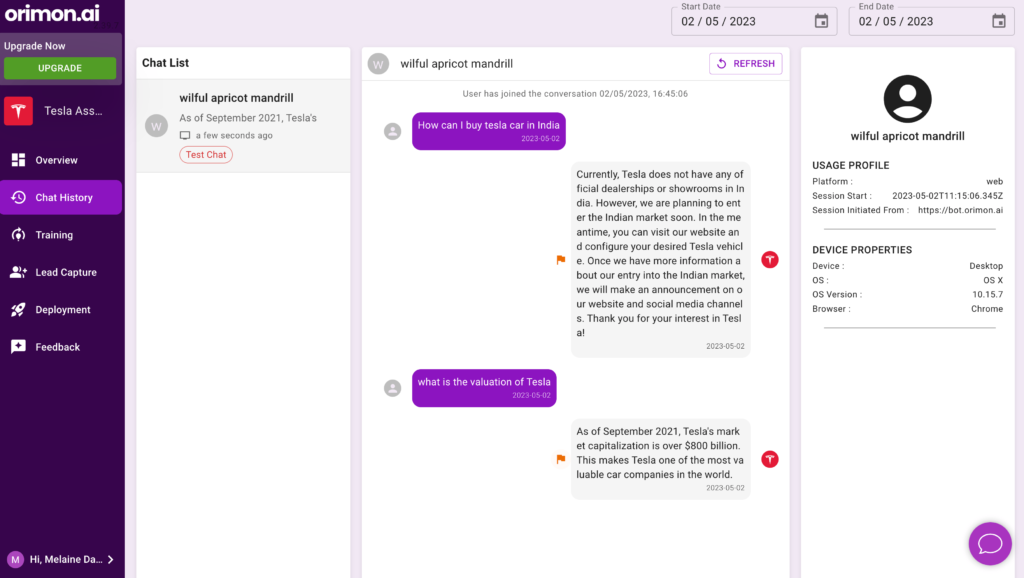
Flag Incorrect Responses from Chat History
Incorrect responses aren’t just limited to the testing phase. As your chatbot interacts with users, you might notice areas for improvement in its chat history. To flag these responses, select the problematic message and hit the “Flag” button.
Navigate to the Training Page
Once you’ve flagged the necessary responses, head over to the training section. Here, you’ll see all flagged query-response pairs grouped together for correction.
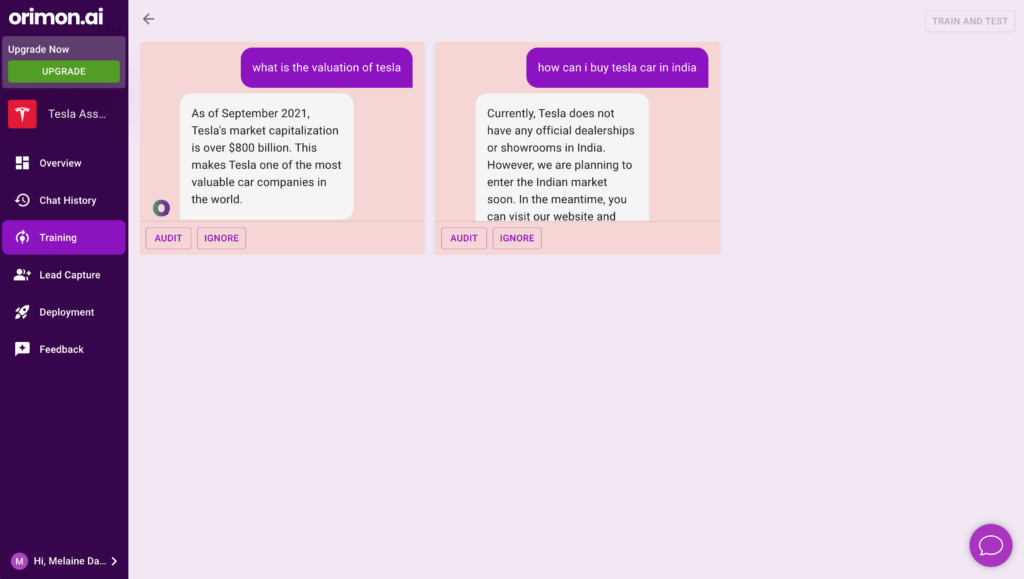
Audit and Update Correct Responses
To correct a flagged message, click on the “AUDIT” button next to it. Here, you can update the flagged response with the correct information.
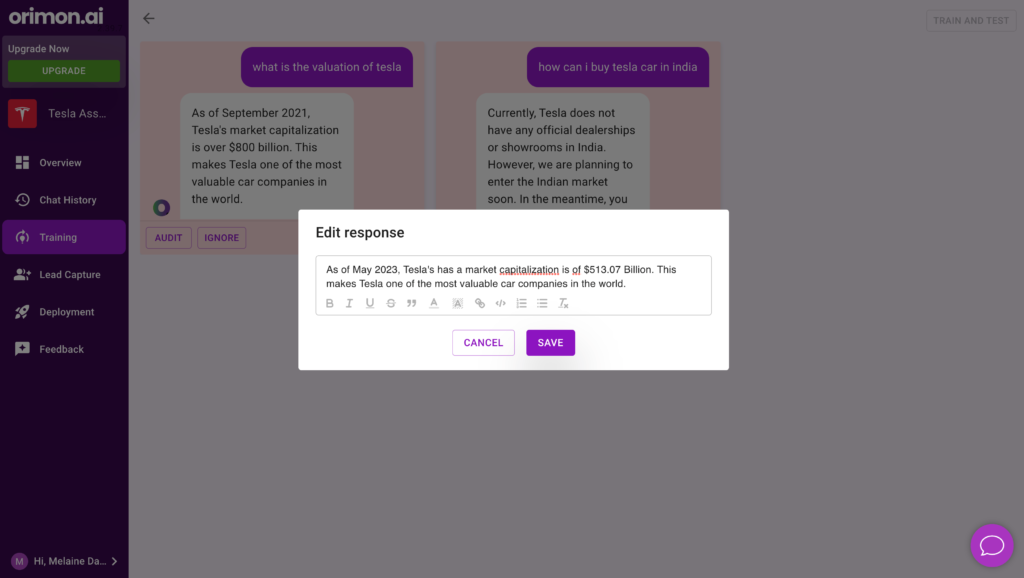
Train Your Chatbot with the Corrected Responses
After you’ve corrected all flagged messages, it’s time to train your chatbot with these updated responses. Once the training process is successfully completed, you’ll be redirected to the testing screen. Here, you can verify that your chatbot now knows the updated responses.
This iterative process of flagging and training ensures that your chatbot is continuously improving, making it an increasingly effective tool for your business. Up next, we’ll discuss how to integrate your newly trained chatbot with your website.
Step 4: Customize Your Chatbot’s Appearance
Every brand has its unique identity, and it’s important that your chatbot reflects this. Orimon AI allows you to personalize your bot’s appearance to fit your brand aesthetic, providing a seamless experience for your website visitors.
Here’s how you can customize your chatbot’s appearance:
Navigate to Your Bot’s Overview Page
After logging into Orimon AI, you’ll see an overview icon for your chatbot. Click on this icon to navigate to your bot’s overview page.
Access the Bot Appearance Tab
Once on the overview page, you’ll see several tabs relating to different aspects of your chatbot. Look for the tab labeled “Bot Appearance” and click on it.

Customize Your Bot’s Appearance
You will now be redirected to a page where you can alter your chatbot’s appearance. Here, you can adjust elements like your chatbot’s color scheme, avatar, name, and introductory text to align with your brand identity.
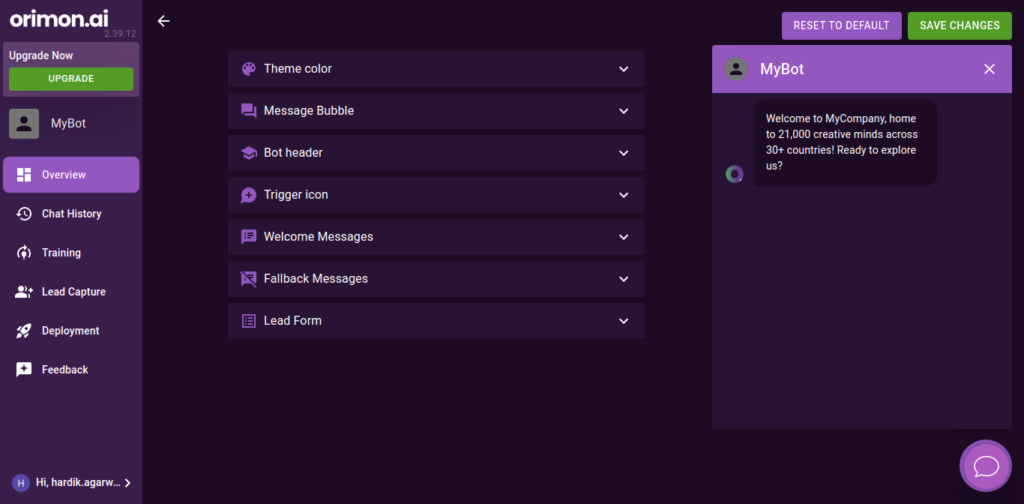
Save Your Changes
Once you’re happy with your chatbot’s new look, don’t forget to click the “Save Changes” button to apply your customizations. This will ensure that your bot’s new appearance is displayed during interactions with website visitors.
Remember, a chatbot that aligns with your brand can help provide a consistent, enjoyable experience for users, increasing their trust in your brand.
In the next step, we will explore how to integrate your chatbot with your website for seamless interaction with your visitors.
Step 5: Configure Channels for Message Delivery
One of the great advantages of using Orimon AI is the flexibility it provides for message delivery. Think of it as a magical bridge that connects your chatbot to various platforms, including Telegram, Instagram, Facebook Messenger, GBM, WordPress, and even your own website. This diversity in communication channels not only facilitates easier conversation with your chatbot but also broadens your reach to prospective customers.
When your chatbot can be accessed through a variety of channels, it’s like having a big neon sign saying, “We’re available wherever you are!”. This boosts the visibility and accessibility of your business, which in turn fosters growth as more people engage with your chatbot and ultimately become customers.
So, let’s get started on setting up your message delivery channels:
Navigate to Your Bot’s Overview Page
After logging in to Orimon AI, click on the overview icon for your chatbot. This will take you to your bot’s overview page.
Access the Channels Tab
On the overview page, you will find several tabs each dedicated to different aspects of your chatbot. Locate and click on the “Channels” tab.

Following these steps will take you to the channels settings page where you can set up and manage the platforms through which your chatbot will deliver messages.
On this page, you can link various platforms to your chatbot, expanding its reach and making it more accessible to your customers, wherever they may be.
Remember, the more channels your chatbot can operate in, the easier it is for customers to connect with your business, improving customer satisfaction and ultimately driving business success.
In the next step, we will delve into the live chat functionality and how it enhances the performance of your chatbot.
Step 6: Implementing Live Chat Functionality
Incorporating human interaction in a chatbot conversation is essential, especially when handling complex or urgent customer inquiries. That’s where Orimon AI’s Live Chat Handover feature comes into play. It provides customers with a reliable fallback option, allowing them to exit a chatbot conversation and connect with a live agent when needed. Here’s a guide on how this transition happens:
User Transition to a Live Agent
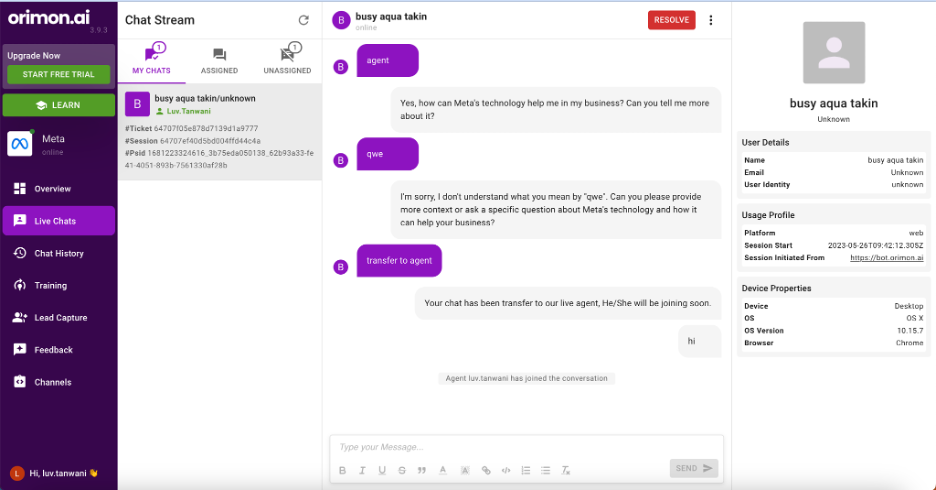
Users can request a conversation with a live agent through two methods:
- By clicking the live chat icon in the Chat Window Header
After a few messages have been exchanged between the bot and the user, a chat-agent button appears next to the close chat window button.
When the user clicks this button, all members present on their dashboard receive a notification indicating the user’s request for a live chat. - By making a request via a message
Orimon AI is designed to understand user requirements dynamically. To request a chat with a live agent, a user can type it directly into the message box. Users can phrase this in various ways, such as “seek human intervention,” “talk to agent,” “transfer to agent,” “talk to human,” “I need human assistance,” or “can I chat with a customer support representative?” The bot will understand these requests and transfer the chat to the live chat waiting queue.
This seamless transition from bot to human ensures that your users receive the help they need when they need it, improving customer satisfaction and maintaining the high service standards of your business.
In the final step, we’ll cover how to integrate Orimon AI with your existing CRM systems and sales tools. This ensures a smooth transition and optimal synergy between your digital tools.
Step 7: Utilizing Webhook Integration for Lead Syncing
Webhook integration is a powerful feature that allows you to sync all leads to your private servers. It ensures that valuable customer data gathered by your bot is readily available for your business to analyze and leverage. Platforms like Zapier or Make.com can be used in conjunction with this webhook for even more robust automation.
Here’s a detailed guide on how to set it up:
- Access the bot’s overview page: Log in to Orimon AI using your account. Once logged in, click on the overview icon for your bot to access the bot’s overview page.
- Navigate to Integrations: On the left, you’ll see a panel with a list of configuration options. At the bottom, you’ll find an option labeled “Integrations”. Click this option to navigate to the integrations page.
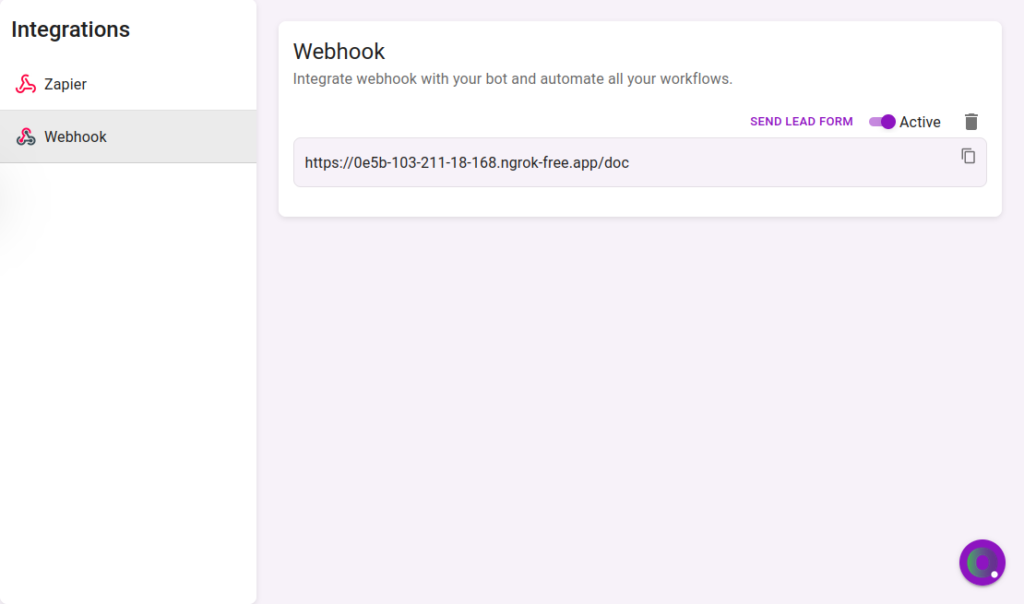
- Configure the webhook: Once you’re on the integrations page, click on “Webhook”. This will open a page where you can paste the endpoint of the server where you receive and process your leads into the “Webhook URL” input field.
Please Note: Your server must be configured to accept POST requests. When you provide a server endpoint, Orimon AI will send a dummy POST request which must return a status code of 200 for verification. If this verification fails, no lead data will be sent and the server endpoint won’t be saved for data syncing. - Submit the information: Click on the “Submit” button. If the integration is successful, you’ll see your server URL in the input box and will start receiving all leads in a POST request at your provided server.
Integration Settings:- “Send Lead Form” button: This option enables you to resend all stored leads data at that point, useful in case of data loss.
- “Active” switch: This switch allows you to temporarily disable lead data syncing. You can use this feature when your servers are temporarily down for maintenance.
- “Delete” button: This option allows you to remove the integration altogether.
With this setup, your lead data will be directly delivered to you for use as you see fit. It helps streamline your lead management process, ensuring you never miss a potential customer inquiry and can act promptly on the information gathered by your AI assistant.
Wrapping Up
With platforms like Orimon AI, setting up an AI chatbot on your website is now a straightforward, no-code process. By using a chatbot, you can provide instant, personalized customer service and drive engagement, leading to higher conversions and increased revenue. It’s time to embrace the future of customer interaction—it’s here, and it’s conversational.


GIPHY App Key not set. Please check settings